 Pin It
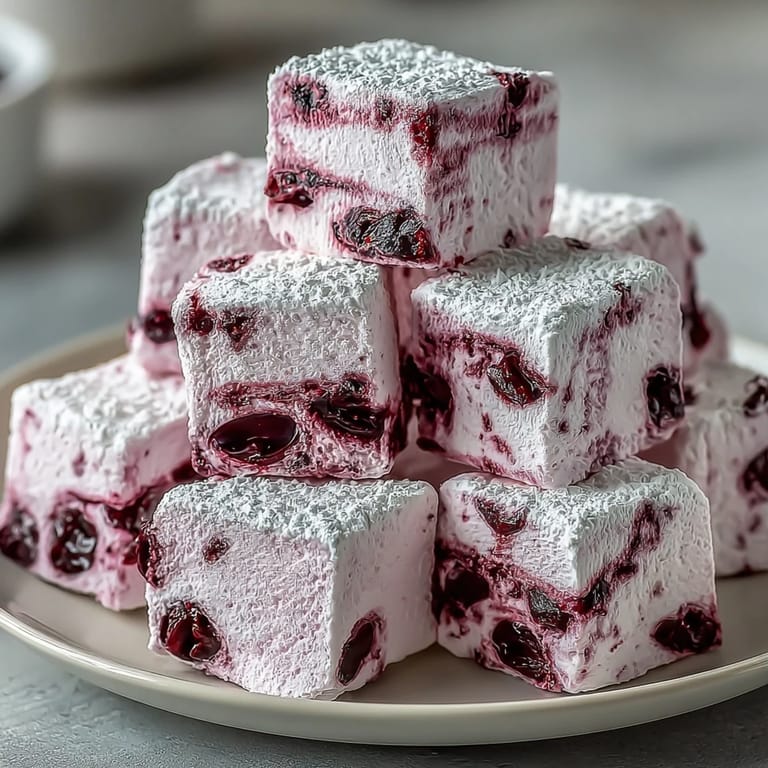
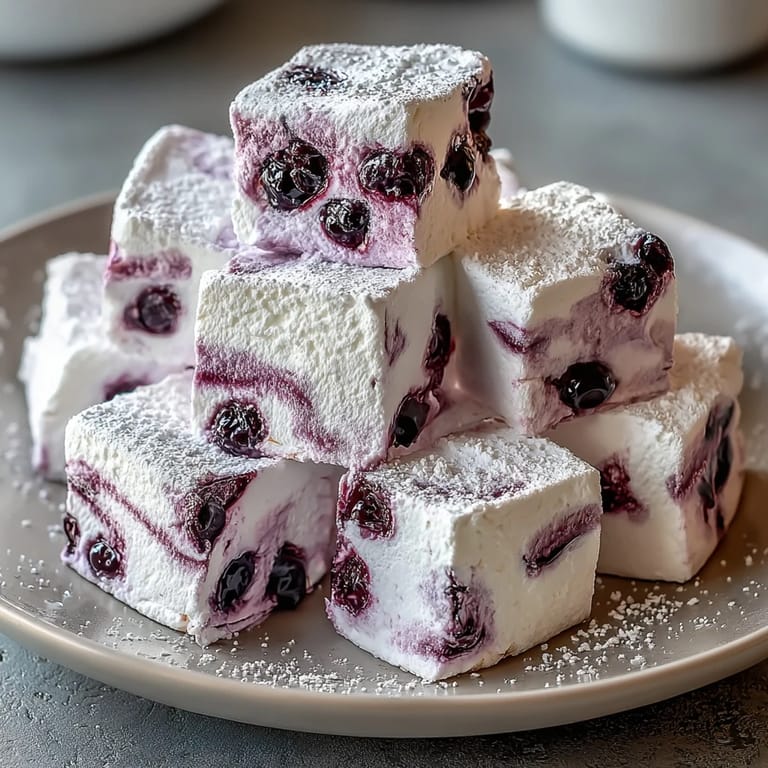
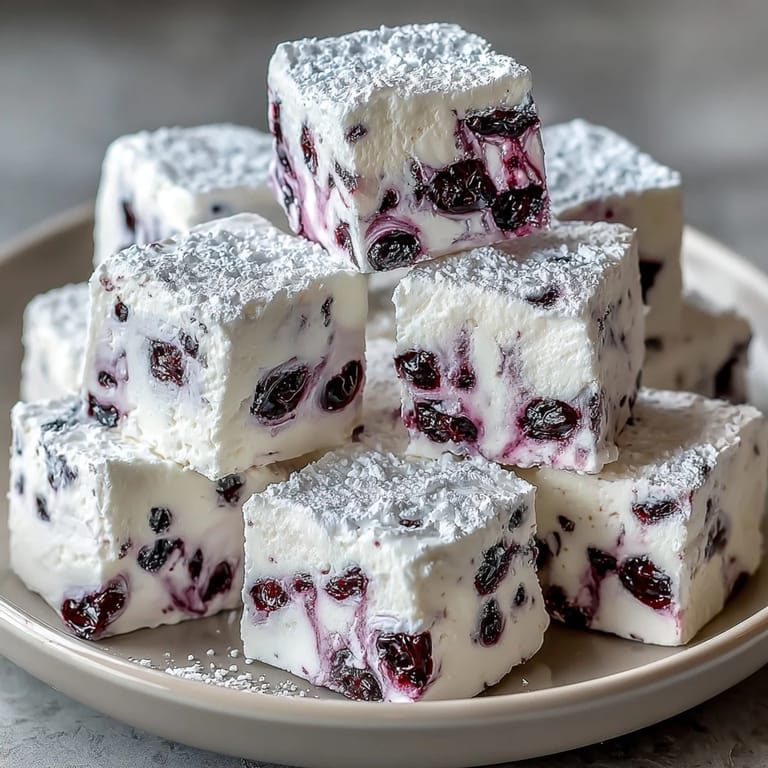
 There's something wonderfully unexpected about homemade marshmallows, especially when they're tinted that jewel-like lavender from blackcurrant purée. I stumbled into making these during a particularly slow afternoon when I found a bag of frozen blackcurrants in my freezer and absolutely no plan for them. The kitchen filled with this tart, berry-sweet smell as they simmered down, and something about watching that syrup climb to exactly 240°F on the thermometer felt like I was finally understanding what marshmallows were supposed to be. What emerged from the stand mixer—this cloud of silky, pillowy lightness—convinced me that homemade was the only way forward.
I brought a batch to a dinner party where a friend was skeptical about homemade marshmallows until she tasted one and went silent for a moment. That pause before "oh wow" told me everything—these aren't just a project, they're a showstopper. Now whenever someone visits, they ask if I have any on hand.
Ingredients
- Blackcurrant Purée (2/3 cup): The star of the show—fresh or frozen blackcurrants blended smooth and strained to remove seeds, giving that gorgeous color and tart edge that balances sweetness.
- Powdered Unflavored Gelatin (3 packets): This is what gives marshmallows their signature spongy structure; blooming it properly ensures a smooth, lump-free texture.
- Granulated Sugar (1 1/2 cups): Combined with corn syrup and water, it creates the syrup that, when whipped with gelatin, becomes this ethereal cloud.
- Light Corn Syrup (1/2 cup): Prevents crystallization and keeps the marshmallows tender; don't skip it even if you're tempted.
- Cold Water (1/2 cup for gelatin, 1/4 cup for syrup): Cold water blooms the gelatin gently; warm water for the syrup mixture dissolves sugar evenly.
- Salt (1/4 tsp): A whisper of salt amplifies the blackcurrant flavor and cuts through the sugar.
- Vanilla Extract (1 tsp): Rounds out the flavor profile and adds warmth underneath the tart fruit.
- Confectioners Sugar & Cornstarch (for dusting): This mixture prevents sticking and creates that classic marshmallow coating that doesn't feel greasy like powdered sugar alone.
Tired of Takeout? 🥡
Get 10 meals you can make faster than delivery arrives. Seriously.
One email. No spam. Unsubscribe anytime.
Instructions
- Prep Your Pan:
- Line an 8x8 inch baking pan with parchment paper, leaving some overhang on the sides so you can easily lift out the finished slab. Dust the bottom and sides generously with a mixture of confectioners sugar and cornstarch—this prevents sticking and creates that classic marshmallow texture on all sides.
- Cook the Blackcurrant Purée:
- In a small saucepan, combine blackcurrant purée, 2 tbsp water, and 2 tbsp sugar over medium heat. Stir gently as it bubbles away for 4–5 minutes until it thickens slightly and becomes more concentrated in flavor. Set it aside to cool completely—this step ensures the tart flavor stays bright instead of cooking off.
- Bloom the Gelatin:
- Pour 1/2 cup of cold water into your stand mixer bowl and sprinkle the gelatin over it evenly. Let it sit untouched for 10 minutes; this allows each granule to absorb water, ensuring a smooth base with no lumps when you whip it.
- Make the Syrup:
- In a medium saucepan, combine 1 1/2 cups sugar, corn syrup, and 1/4 cup water. Stir over medium-high heat until the sugar dissolves, then stop stirring—let it bubble undisturbed until a candy thermometer reads 240°F (soft ball stage). This precise temperature is crucial; too low and your marshmallows stay dense, too high and they become grainy.
- Whip into Clouds:
- With the mixer running on low speed, pour the hot syrup into the bloomed gelatin in a thin, steady stream (it will sizzle slightly). Once it's all in, increase the speed to high and whip for 6–8 minutes, watching as the mixture transforms from syrupy and glossy to thick, pale, and nearly tripled in volume. You'll hear the sound shift from a wet splatter to an airy whisk cutting through foam.
- Add Flavor & Color:
- With the mixer still running, add salt, vanilla extract, and the cooled blackcurrant purée. Whip for another 1–2 minutes until the mixture turns a soft lavender color and everything is evenly distributed. Be patient here—the color will deepen slightly as you fold it in.
- Set in the Pan:
- Pour Immediately:
- Quickly transfer the mixture to your prepared pan and smooth the top with a spatula, working fast because it starts to set immediately. Sift a generous layer of the sugar-cornstarch mixture over the top and let it sit uncovered at room temperature for at least 4 hours, until completely firm to the touch.
- Cut & Finish:
- Turn the entire slab onto a cutting board and peel away the parchment paper. Dust all exposed sides with the sugar-cornstarch mixture, then cut into 24 squares using a sharp knife dipped in the same mixture—this prevents sticking and gives each marshmallow that classic dusted look.
 Pin It
 There was a moment during my third batch when everything clicked—I stopped thinking about temperatures and ratios and just felt the transformation happening under the mixer's whisk. That's when I understood that marshmallows aren't just candy; they're a small miracle of chemistry that tastes like celebration.
Storage & Keeping
Store your marshmallows in an airtight container at room temperature for up to a week, with a sheet of parchment between layers to prevent sticking. I learned the hard way that humidity affects them; if the air is particularly damp, they'll soften slightly, so seal them tight. They also freeze beautifully for up to three months if you want to make ahead for gifts.
Flavor Variations & Pairings
While blackcurrant is wonderfully tart and sophisticated, this recipe is your canvas. Blackberry, raspberry, or cherry purée swap in seamlessly—just follow the same cooking and cooling steps. The variations I've tried most often are a deeper, earthier blackberry version for fall and a bright raspberry version for spring entertaining.
Serving Suggestions & Moments
These shine in so many ways: nestled into a steaming mug of hot cocoa where they melt into ribbons of color, paired alongside dark chocolate as a sophisticated dessert, or simply eaten straight from the container with coffee on a quiet morning. I've also dusted them with freeze-dried berries for extra tartness, which adds a little crunch that's absolutely addictive.
- Dip the edges in melted dark chocolate for an elegant touch that makes them feel like fancy confectionery.
- Layer them into s'mores with a really good graham cracker and dark chocolate for something unexpected and memorable.
- Make these a day or two ahead of a dinner party so you have one less thing to worry about on the day itself.
 Pin It
 Homemade marshmallows are one of those recipes that feels impossibly fancy until you make them, and then you realize they're actually quite doable—and infinitely better than anything store-bought. Once you nail this method, you'll find yourself making them constantly, experimenting with flavors, gifting them to friends, and wondering why you didn't start sooner.
Questions About This Recipe
- → How do I achieve the perfect fluffy texture?
Bloom gelatin first and whip the sugar syrup mixture thoroughly until thick and tripled in volume for the ideal fluffiness.
- → Can I substitute blackcurrant purée with other fruits?
Yes, alternatives like blackberry, raspberry, or cherry purée provide similar tartness and vibrant color.
- → What is the purpose of dusting with sugar and cornstarch?
This mixture prevents sticking and helps maintain the delicate surface texture of the marshmallow squares.
- → How long should the mixture set before cutting?
Allow at least 4 hours at room temperature to ensure the marshmallows firm up completely for clean slicing.
- → Are these suitable for dietary restrictions?
The treats are gluten-free and nut-free but contain gelatin, making them unsuitable for vegetarians and vegans.