 Pin It
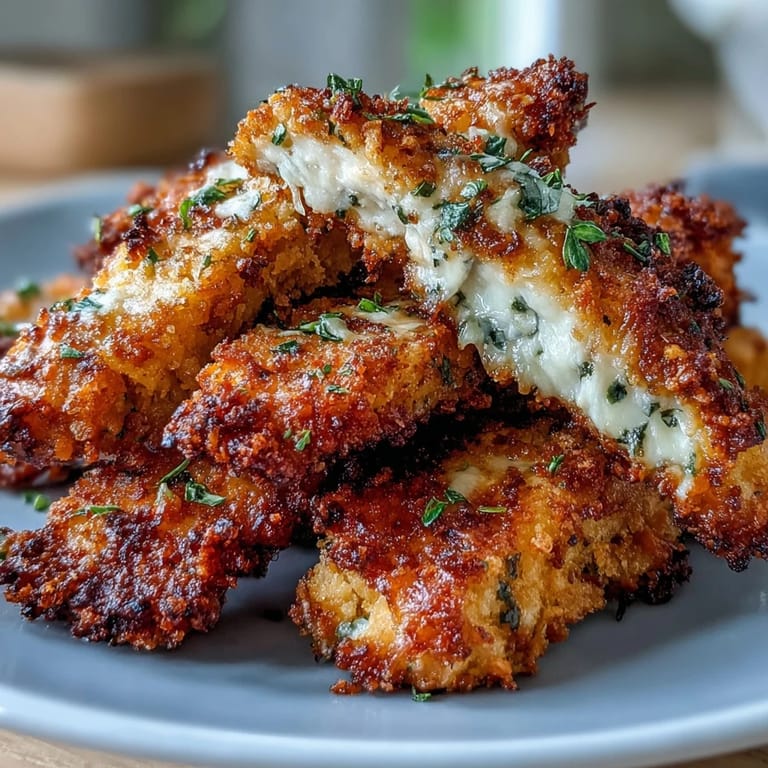
 My kitchen smelled like a Italian-American diner the afternoon my nephew insisted on something he could pick up with his fingers. I had chicken breasts that needed using and a craving for something nostalgic, so I started slicing them thin like fries and realized I'd stumbled onto something that would become his favorite request. The magic happened when I mixed Parmesan into the breadcrumb coating—suddenly it wasn't just fried chicken, it was restaurant-quality comfort that baked in the oven instead of swimming in oil.
I made these for my partner's friends last summer when we were all standing around the kitchen island on a Saturday evening, and someone actually asked for the recipe before dessert arrived. Watching people dip them in marinara with one hand and reach for another with the other—that's when you know you've nailed something. It became our go-to crowd-pleaser, the dish that makes us look like we spent hours cooking when we really just learned to slice smart and let the oven do the work.
Ingredients
- Chicken breasts: Use boneless, skinless ones because they slice clean and cook evenly—roughly 500 grams total gets you enough strips for four people with leftovers.
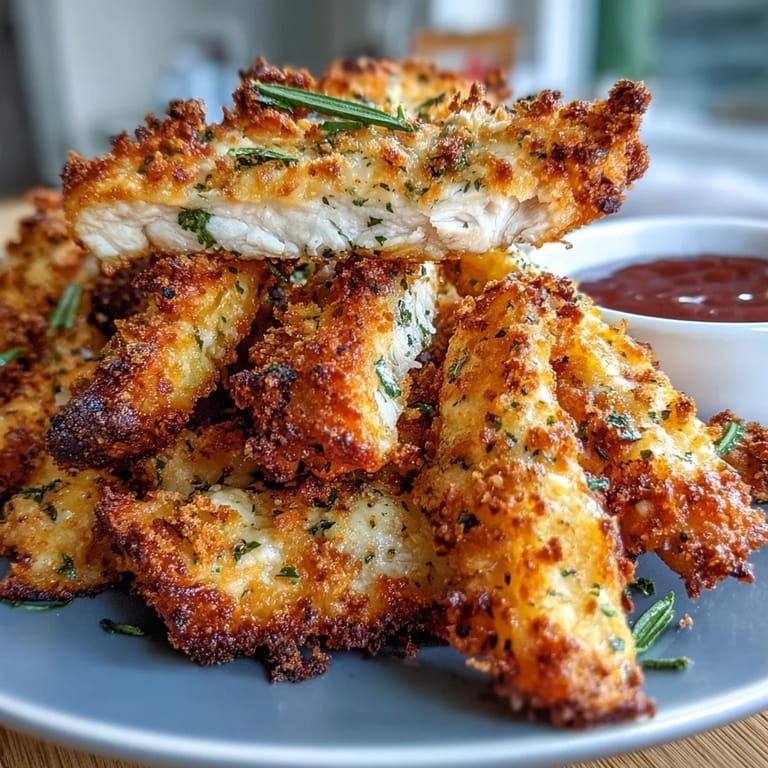
- Panko breadcrumbs: These stay crispier than regular breadcrumbs because of their texture, and they're what gives you that satisfying crunch that lasts even after cooling.
- Parmesan cheese: Freshly grated makes a difference in flavor depth, though pre-grated works if that's what you have on hand.
- Garlic powder and Italian herbs: These two carry the flavor so you're not eating plain breadcrumbs, and they make your kitchen smell inviting while baking.
- Egg and milk mixture: This is your glue, and the milk thins the egg just enough so the coating adheres evenly without creating thick clumps.
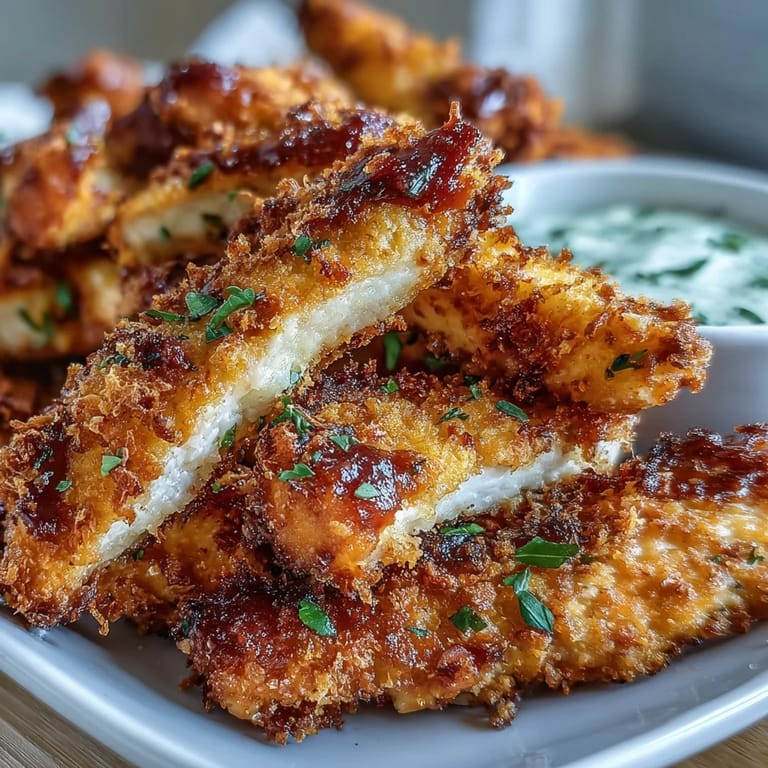
- Marinara and ranch: Serve them cold and warm respectively—the temperature contrast makes dipping more interesting than you'd expect.
Tired of Takeout? 🥡
Get 10 meals you can make faster than delivery arrives. Seriously.
One email. No spam. Unsubscribe anytime.
Instructions
- Set your stage:
- Preheat that oven to 425°F (220°C) and line your baking sheet with parchment paper so nothing sticks. This step takes two minutes but saves you from scraping later.
- Slice like you mean it:
- Lay your chicken breast flat on the cutting board and slice it horizontally into strips about as thick as a proper French fry—roughly a quarter inch. Uneven slices cook at different rates, so take your time here.
- Build your coating stations:
- One shallow bowl for whisking eggs with milk, another for mixing breadcrumbs with Parmesan, garlic powder, Italian herbs, salt, and pepper. Having everything ready before you start coating prevents the egg mixture from getting weird.
- Coat each strip:
- Dip a chicken strip in the egg mixture until it's fully coated, then roll it through the breadcrumb mixture, pressing gently so the coating really sticks. The pressure matters—it creates those little textured spots that get extra crispy.
- Arrange and oil:
- Lay your strips on the baking sheet in a single layer without touching, then spray or drizzle them lightly with oil. This is what creates the golden crispiness instead of a pale, dry result.
- Bake with intention:
- Slide into the oven for 20–25 minutes, flipping them halfway through so both sides get golden. You'll know they're done when they're a deep golden brown and an instant-read thermometer reads 165°F (74°C) in the thickest part.
- Serve while they sing:
- These are best eaten within minutes of coming out of the oven when the crust is still making crackling sounds as you bite down. Garnish with chopped parsley if you want to make them look intentional.
 Pin It
 There's something almost meditative about watching the transformation happen in the oven—translucent raw chicken becoming golden strips that smell like an Italian dinner. My sister called right when they were coming out and I just laughed, telling her to come over because words couldn't do them justice. That's the moment I realized this wasn't just a recipe I'd created, it was a reason to bring people to the table.
Making Them Extra Crispy
If you're someone who chases crunch with the dedication of a hunter, use panko breadcrumbs exclusively and don't skip the oil spray—it's the difference between satisfying and transcendent. Some folks swear by using a wire rack elevated on the baking sheet so air circulates underneath, and honestly, they're right. I've also had success pressing the breadcrumb coating firmly as you apply it, which creates little air pockets that toast up beautifully.
Flavor Variations Worth Trying
Once you nail the classic version, the possibilities start calling to you. I experimented one night by adding a quarter teaspoon of chili flakes to the breading and suddenly had something spicy enough to make people pause and ask for water, but in a good way. You could mix in crushed peppercorn, try a blend of cheeses, or even add a tablespoon of nutritional yeast for deeper flavor without changing the texture.
Serving and Storage Wisdom
Fresh is always best, but I've learned these keep for about three days in an airtight container in the refrigerator and reheat beautifully at 400°F (200°C) for 5–8 minutes until they regain their crispness. A side salad or roasted vegetables rounds out the meal without making it feel heavy, and pairing cold ranch with warm marinara gives people options instead of forcing them into one direction. Here's what I've learned from making these dozens of times:
- Set up your breading stations before you start so the egg mixture doesn't oxidize and get weird.
- Don't skip the halfway flip—it's the secret to even browning that nobody talks about.
- Serve immediately because every minute they sit is a minute of crispness you're losing to steam.
 Pin It
 This recipe taught me that sometimes the best dishes come from practical constraints—using what's in the fridge and making it taste like you meant to do exactly that. Now whenever someone needs something that tastes restaurant-made but doesn't demand hours in the kitchen, these are what I reach for.
Questions About This Recipe
- → How do I get the crispiest coating?
Use panko breadcrumbs instead of regular ones for extra crunch. Lightly spray or drizzle oil on the breaded strips before baking, and flip halfway through cooking time for even golden browning on all sides.
- → Can I make these ahead of time?
Yes! Bread the chicken strips up to 4 hours ahead and refrigerate on the baking sheet covered with plastic wrap. Add 2-3 minutes to the baking time if cooking straight from the refrigerator.
- → What temperature should the chicken reach?
The internal temperature should reach 74°C (165°F) for safe consumption. Use a meat thermometer to check the thickest strip. The coating should be golden brown and the meat opaque throughout.
- → Can I fry these instead of baking?
Absolutely. Heat oil to 350°F and fry for 3-4 minutes until golden and cooked through. Drain on paper towels before serving. The baking method yields similar results with less oil.
- → What other dipping sauces work well?
Beyond marinara and ranch, try garlic aioli, honey mustard, spicy buffalo sauce, or even a lemon-herb yogurt dip. The mild chicken flavor pairs beautifully with various condiments.
- → How should I store leftovers?
Refrigerate in an airtight container for up to 3 days. Reheat in a 200°C (400°F) oven for 5-8 minutes to restore crispiness. Avoid microwaving as it makes the coating soggy.