 Pin It
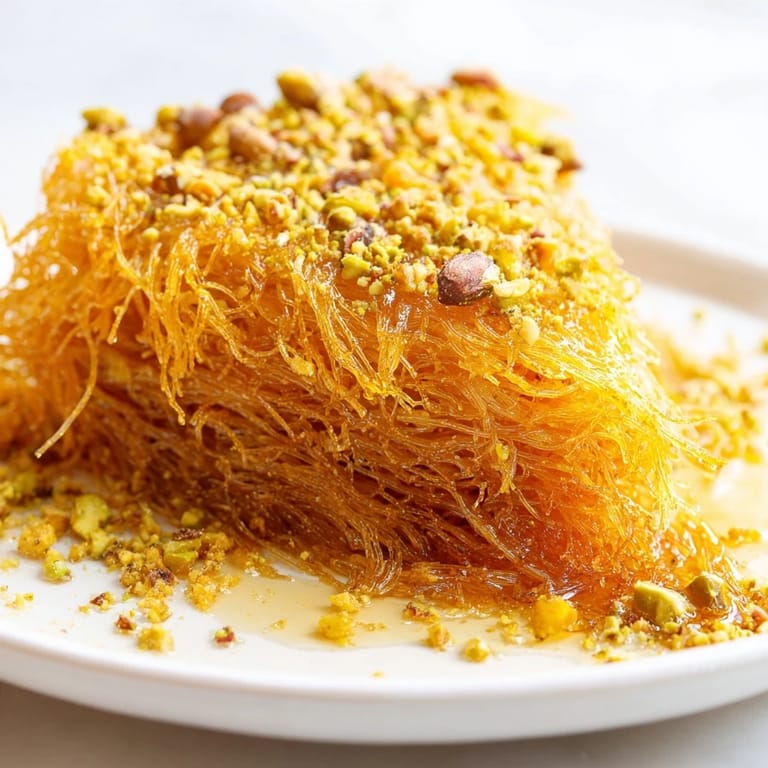
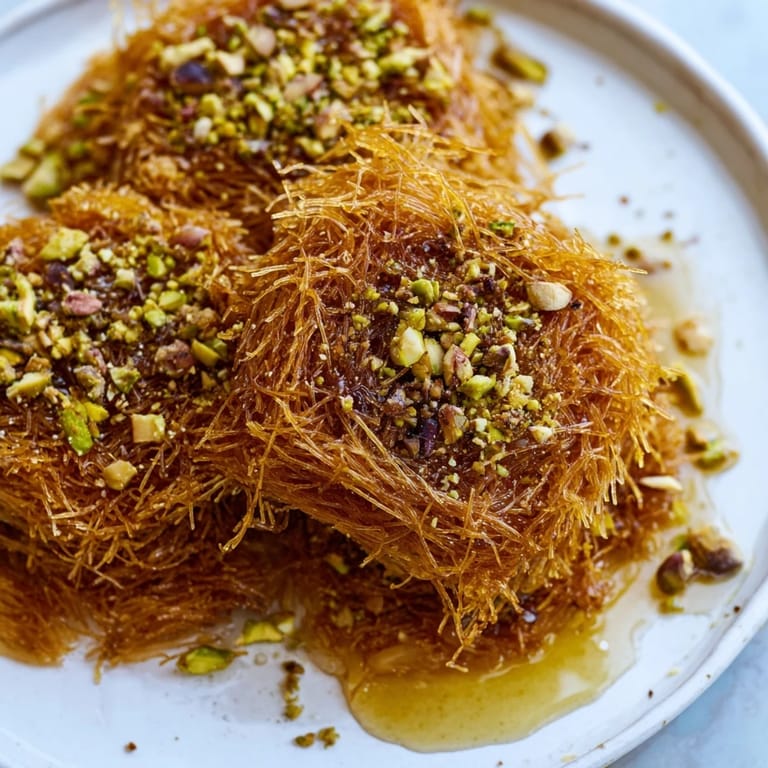
 There's a particular magic that happens when you pull Egyptian konafa from the oven—that moment when the kitchen fills with the aroma of toasted nuts and caramelizing butter, and you know something extraordinary is about to happen. I learned to make this from a neighbor who'd grown up in Cairo, and she taught me that konafa isn't just about following steps; it's about listening to the pastry as it crisps and feeling when the butter has done its golden work. The first time I made it alone, I was nervous I'd mess up the delicate shredded phyllo, but what I discovered was that this dessert is far more forgiving than it looks. Now, whenever I prepare it, I'm transported back to her kitchen, the sound of her humming as she worked, and the way her eyes lit up when that syrup hit the hot pastry.
I once brought konafa to a potluck where everyone was expecting the usual American desserts, and watching people's faces light up as they bit into that first crispy, honeyed piece was pure joy. One guest asked if I'd bought it from a bakery, and I remember feeling both proud and slightly mischievous not correcting them immediately. It became the dish I'm now asked to bring to every gathering, which I don't mind one bit because making it has become my meditation.
Ingredients
- Kataifi (shredded phyllo dough), 500 g: This delicate, hair-thin pastry is the soul of konafa—make sure it's fully thawed so the strands separate easily without tearing, and keep it covered with a damp towel while you work.
- Unsalted butter, melted, 200 g: Don't skip the melting step; cold butter won't distribute evenly and your pastry won't achieve that coveted golden crispness.
- Walnuts, finely chopped, 150 g: Walnuts provide an earthy depth that balances the sweetness beautifully.
- Pistachios, finely chopped, 100 g: These add a subtle sweetness and vibrant color that makes each bite feel special.
- Almonds, finely chopped, 50 g: Almonds contribute a delicate texture and mild flavor that ties the nut mixture together.
- Granulated sugar, 60 g: This sweetens the filling without overpowering the nutty flavors.
- Ground cinnamon, 1 tsp: Cinnamon is the spice that makes people ask what that incredible aroma is.
- Ground cardamom, 1/4 tsp: Cardamom adds an almost floral note that distinguishes Egyptian konafa from other nut pastries.
- Granulated sugar, 200 g: This creates the syrup base that will soak into the hot pastry.
- Water, 120 ml: The vehicle for dissolving sugar and creating that glossy, soakable syrup.
- Honey, 2 tbsp: Honey rounds out the sweetness with depth and helps create that signature sticky-crispy texture.
- Lemon juice, 1 tsp: A squeeze of brightness that prevents the syrup from becoming cloying.
- Rose water or orange blossom water, 1 tsp (optional): This optional ingredient is what transforms good konafa into the kind people remember and ask about months later.
Tired of Takeout? 🥡
Get 10 meals you can make faster than delivery arrives. Seriously.
One email. No spam. Unsubscribe anytime.
Instructions
- Prepare your canvas:
- Preheat your oven to 180°C and brush a 23 cm round pan generously with melted butter—this is your insurance against sticking. The heat should be ready and waiting, almost eager to crisp that pastry.
- Awaken the kataifi:
- Take the thawed kataifi and gently tease the strands apart with your fingers, working slowly to avoid breaking them into pieces. It should feel almost like you're fluffing up a cloud, and you want it light and separated before it goes into the pan.
- Build the first layer:
- Press half the loosened kataifi into your buttered pan, creating an even base that covers the entire surface. Drizzle this layer with half your melted butter, using a pastry brush to ensure every strand gets kissed by the golden liquid.
- Add the heart:
- Mix your chopped walnuts, pistachios, almonds, sugar, cinnamon, and cardamom in a bowl until well combined. Spread this fragrant mixture evenly over the buttered kataifi layer—this is where the flavor magic happens.
- Crown your creation:
- Layer the remaining kataifi on top and press gently but firmly so everything holds together as it bakes. Drizzle the final amount of melted butter over the top, making sure to reach every corner so the entire surface turns golden.
- Bake until golden:
- Place in your preheated oven for 30 to 35 minutes, watching as the pastry transforms from pale and soft to crackling and amber-colored. You'll know it's done when the edges are dark golden and the whole thing smells like toasted nuts and caramel.
- Make the syrup while it bakes:
- Combine your sugar and water in a saucepan and bring to a boil, then reduce heat and let it simmer gently for 7 to 8 minutes. Remove from heat and stir in the honey, lemon juice, and rose or orange blossom water if you're using it, then let it cool slightly so it's warm but not scalding.
- The crucial moment:
- The second the konafa comes out of the oven, pour the warm syrup evenly over the entire hot pastry—the heat is essential here because it allows the pastry to drink in the sweetness rather than sitting on top. Listen for that satisfying sizzle; that's the sound of alchemy happening.
- Rest and reveal:
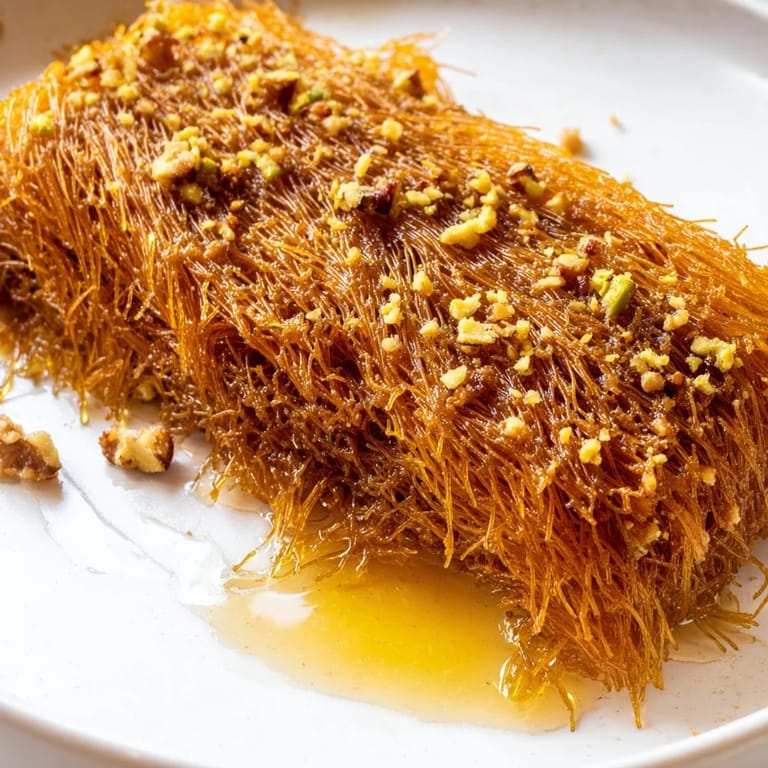
- Let it cool for a full 30 minutes before slicing—this patience allows everything to set up so your pieces stay intact instead of falling apart. Cut into diamonds or squares with a sharp knife, using a gentle sawing motion to avoid crushing the delicate layers.
 Pin It
 What still moves me about this dessert is how it brings people together in a way that requires no words. I've watched strangers at parties strike up conversations over a plate of konafa, and I've had family members request it for birthdays and quiet Sunday afternoons alike. It's become less about the recipe and more about the moment of sharing something that feels both exotic and deeply comforting.
The Art of the Perfect Bite
The ideal konafa bite is an architectural achievement—you want the crisp, buttery exterior to give way without shattering completely, releasing the warm, spiced nuts and that amber syrup all at once. The secret is in the resting time; too many people cut into it while it's still hot and steaming, which results in a knife sliding through rather than slicing, and a crumb that falls apart before it reaches your mouth. I learned to slice while it's still warm but set, which gives you clean, beautiful pieces that hold their shape on the plate and stay structurally sound through the whole eating experience.
Playing with the Filling
While the traditional trio of walnuts, pistachios, and almonds is absolutely perfect, I've experimented with substitutions based on what's in my pantry and what I'm craving. Hazelnuts bring an earthiness that's particularly lovely in autumn, cashews add an unexpected creaminess, and pecans give the whole thing a richer, almost buttery quality. The key is to keep the total weight around 300 grams and to maintain roughly similar chopping sizes so the texture remains consistent. I once tried mixing in some finely chopped dried apricots, which added a subtle tartness that balanced the sweetness in an unexpected way, though my neighbor from Cairo gave me a look that said I was getting too creative for her tastes.
Syrup Science and Serving Suggestions
The honey syrup is where konafa truly becomes special, and getting it right is entirely within your control. Some recipes call for much more honey, but I've found that a smaller amount combined with lemon juice creates a syrup that's sweet without being overwhelming, and the acidity keeps it from tasting one-dimensional. The optional rose or orange blossom water is genuinely life-changing if you can find it—just a teaspoon transforms the entire dessert into something that tastes like it came from a sophisticated patisserie. As for serving, konafa stands beautifully on its own, but I've discovered that a dollop of whipped cream or a scoop of vanilla ice cream creates a contrast that makes people close their eyes and smile. Some friends swear by pairing it with fresh berries, which add brightness and cut through the richness.
- Serve konafa at room temperature for the best texture and flavor expression.
- Store leftovers in an airtight container for up to three days, though it's rarely around that long.
- Warm it gently in a low oven before serving if you've made it a day or two ahead, and it tastes almost as good as freshly made.
 Pin It
 Making konafa has taught me that some of the most rewarding dishes in the kitchen require patience, not complexity. Every time I prepare it, I'm reminded that good food is less about following instructions perfectly and more about caring about each step along the way.
Questions About This Recipe
- → What is kataifi dough?
Kataifi dough consists of thin, shredded phyllo strands that create a crisp texture when baked, commonly used in Middle Eastern desserts.
- → Can I substitute the nuts in this dish?
Yes, you can replace walnuts, pistachios, or almonds with hazelnuts, cashews, or pecans to suit your taste.
- → How is the honey syrup prepared?
The syrup is made by boiling sugar and water, then simmering briefly before mixing in honey, lemon juice, and optional floral water for aroma.
- → What is the ideal texture after baking?
The kataifi layers should be crisp and golden, while the nut filling remains moist and flavorful beneath the syrup glaze.
- → How do I serve this dessert?
Allow the dish to cool and absorb the syrup fully, then slice into diamonds or squares and serve at room temperature.
- → Are there any suggested accompaniments?
Fresh berries or a dollop of whipped cream enhance the nutty, sweet profile of the dessert.