 Pin It
 My neighbor knocked on my kitchen door one March morning with a grin, asking if I could help her brainstorm St. Patrick's Day treats for her daughter's school party. We stood there surrounded by green sprinkles and chocolate chips, and suddenly I remembered those tiny hat-shaped desserts I'd seen at a bakery years ago. That afternoon, we invented these Leprechaun Hat Brownie Bites together, laughing as marshmallows kept flying off our toothpicks.
Last year when I made these for a neighborhood gathering, I set up a little decorating station and let everyone customize their hats with different shades of icing. Watching grown adults debate whether the gold buckle should be perfectly centered while munching on warm brownie bites reminded me that the best moments in the kitchen happen when people actually get their hands involved.
Ingredients
- Unsalted butter, melted (1/2 cup): Melted butter blends seamlessly with sugar and eggs, creating that impossibly fudgy crumb that makes these brownies addictive rather than cakey.
- Granulated sugar (1 cup): Don't skimp here; this is what gives you that slight crisp edge while keeping the inside tender.
- Large eggs (2): They're your binding agent and also add moisture that makes these bites feel almost gooey in the best way.
- Vanilla extract (1 tsp): A small amount that rounds out the chocolate flavor without announcing itself.
- Unsweetened cocoa powder (1/3 cup): Use quality cocoa if you can; it makes a noticeable difference in depth and richness.
- All-purpose flour (1/2 cup): This keeps the brownies from being too dense, but not too much or you'll lose that fudgy texture.
- Salt (1/4 tsp): The secret ingredient that makes chocolate taste more like itself.
- Baking powder (1/4 tsp): Just enough to give a gentle rise without making them cakey.
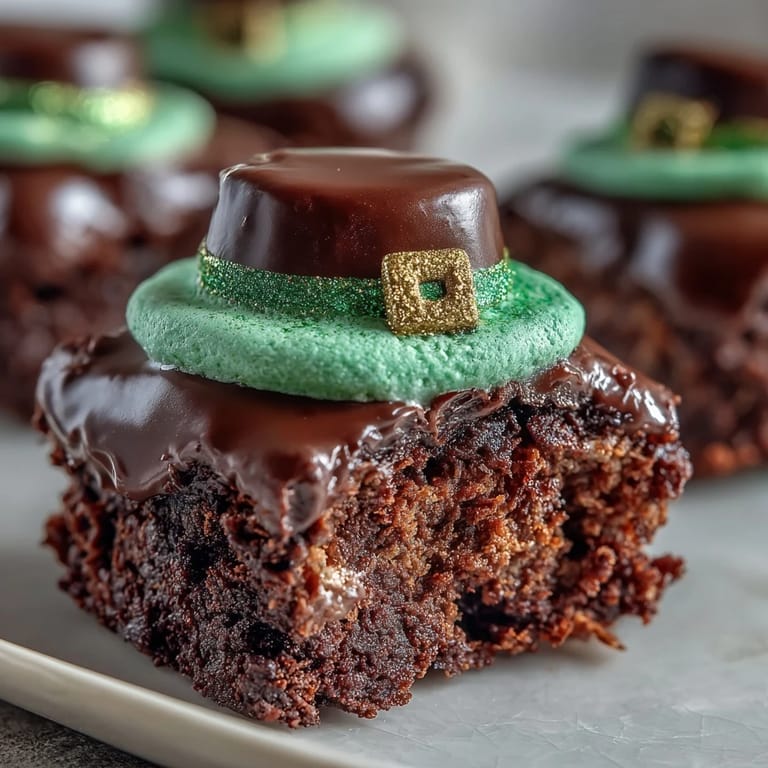
- Large marshmallows (24): The star of the hat; look for ones that are fluffy and uniform in size for even dipping.
- Dark or semisweet chocolate chips (1 cup): This coats your marshmallow crown and must be smooth and glossy when melted.
- Unsalted butter for chocolate (2 tbsp): This loosens the chocolate slightly so it coats evenly without being too thick.
- Thin, round chocolate wafer cookies (24): These are your hat brim and must be sturdy enough to support the marshmallow without cracking.
- Green icing: The finishing touch that makes these unmistakably festive; homemade tastes better but store-bought saves time.
- Gold sprinkles or edible glitter (optional): The leprechaun buckle that catches the light and makes everything feel magical.
Tired of Takeout? 🥡
Get 10 meals you can make faster than delivery arrives. Seriously.
One email. No spam. Unsubscribe anytime.
Instructions
- Prepare your workspace:
- Preheat your oven to 350°F and grease a mini muffin pan thoroughly or line it with liners so your tiny brownies won't stick. Having everything ready before you start mixing is the difference between a smooth process and frustration halfway through.
- Mix the wet ingredients:
- Whisk the melted butter and sugar together until they're completely combined and look pale and slightly grainy. Add your eggs and vanilla, stirring until the mixture is smooth and homogeneous, which takes maybe a minute if you're being thorough.
- Fold in the dry ingredients:
- Sift your cocoa powder, flour, salt, and baking powder directly into the wet mixture and stir gently until just combined. You'll know you're done when you don't see any streaks of flour anymore; stop there, because overmixing makes brownies tough.
- Fill and bake:
- Spoon the batter into each cup until it's about two-thirds full, then slide the pan into your preheated oven for 12 to 15 minutes. They're done when a toothpick inserted into the center comes out mostly clean with just a few moist crumbs clinging to it; don't overbake.
- Cool completely:
- Let the brownie bites rest in the pan until they're completely cool to the touch, which prevents them from crumbling when you remove them. This patience pays off and only takes about 15 minutes at room temperature.
- Melt the chocolate coating:
- In a microwave-safe bowl, combine your chocolate chips and 2 tablespoons of butter, then microwave in 30-second bursts, stirring between each interval until the mixture is perfectly smooth. This gentle approach prevents the chocolate from seizing or becoming grainy.
- Dip the marshmallows:
- Insert a toothpick into the flat end of each marshmallow and dip it fully into the melted chocolate, allowing excess to drip back into the bowl. Let the coated marshmallows rest on a parchment-lined surface until the chocolate sets firm, about 5 minutes.
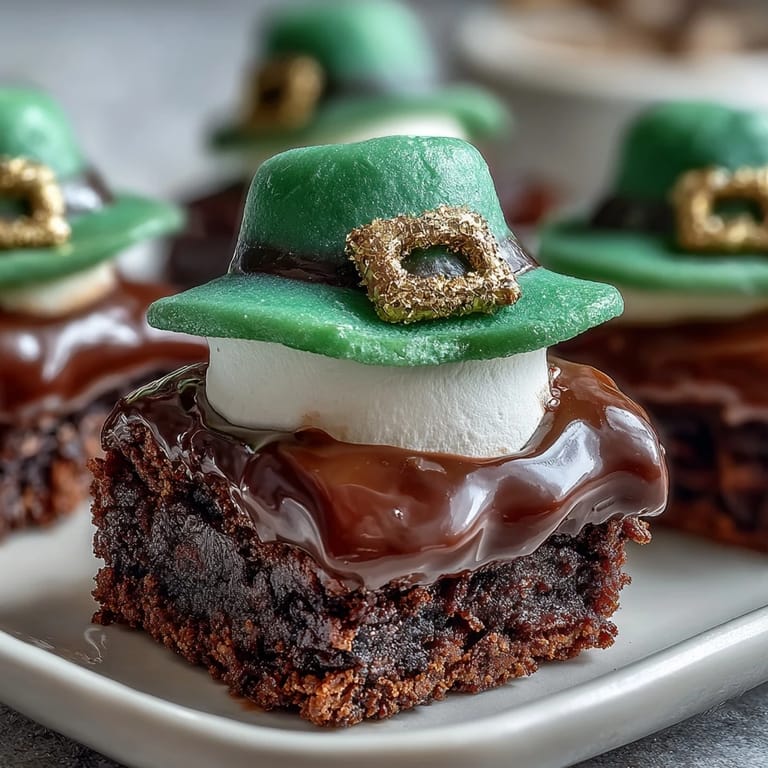
- Assemble the hat base:
- Place each chocolate-dipped marshmallow on top of a chocolate wafer cookie so that the wafer becomes the hat's brim. The marshmallow should sit securely on the wafer; if it doesn't, the wafer might be too soft, so let it firm up in the refrigerator.
- Add the icing band:
- Using a piping bag or a small zip-top bag with a corner snipped off, pipe a band of green icing around the base of each marshmallow where it meets the wafer. Make it thick enough to look deliberate, like a proper leprechaun hat band.
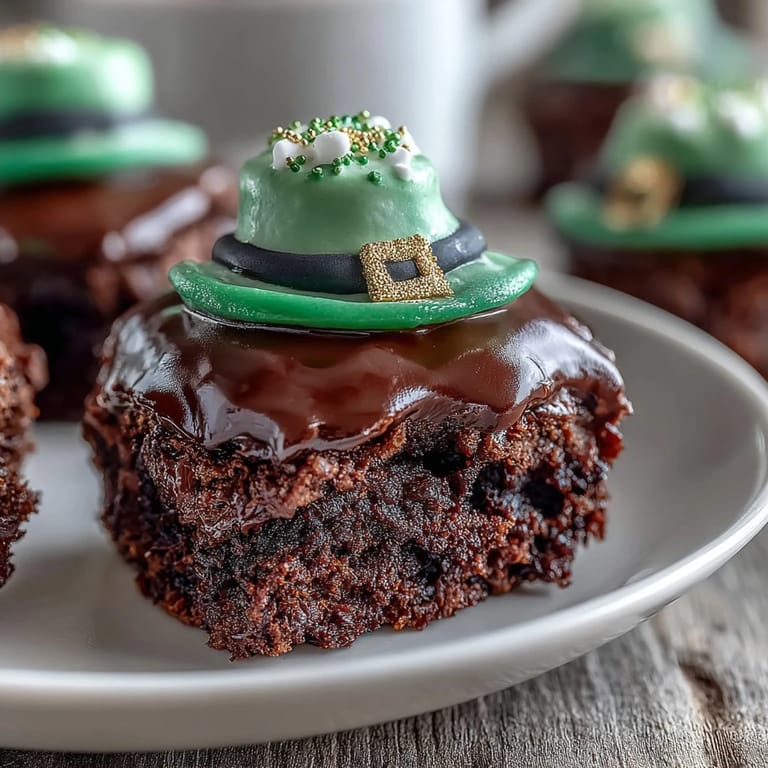
- Crown with gold:
- Sprinkle a bit of gold edible glitter or sprinkles on top of the green icing band to create the buckle effect. Place each finished leprechaun hat on top of a brownie bite and gently press so it adheres, then carefully remove the toothpick.
 Pin It
 There's something about handing someone a tiny edible hat perched on top of a warm brownie that makes them smile in a way that regular cookies simply don't. My daughter once told me these were the only reason she didn't skip her St. Patrick's Day party, which tells you everything you need to know about their power.
Making These Gluten-Free
If you need to go gluten-free, swap your all-purpose flour for a one-to-one gluten-free blend and choose gluten-free chocolate wafer cookies in place of the regular ones. The brownies taste just as fudgy and nobody will know the difference unless you tell them, which is the hallmark of a successful substitution.
Storage and Make-Ahead Tips
You can bake the brownie bites up to two days ahead and keep them in an airtight container, then assemble the hat decorations the day you're serving them for maximum freshness and visual impact. The finished bites stay beautiful in an airtight container for up to three days, though they rarely last that long in a house with kids.
Creative Variations to Try
Once you master the basic version, these little treats become your canvas for experimentation and personal touches. I've made versions with white chocolate dipped marshmallows, used different icing colors for other holidays, and even swapped in mint frosting for a fun twist. The structure stays the same but your imagination gets to play, which is honestly the most fun part of cooking.
- Try using colored fondant rolled into thin strips instead of piped icing for a cleaner, more precise hat band.
- Make a Mint Chocolate version by adding 1/2 teaspoon of peppermint extract to your brownie batter and using green icing.
- Stack two brownies together with a tiny dab of frosting in between for extra-indulgent double-stacked hats that feel extra special.
 Pin It
 These Leprechaun Hat Brownie Bites are proof that festive desserts don't have to be complicated to be memorable. Make them once and they'll become your go-to celebratory treat.